Showing posts with label zoya. Show all posts

Saturday, January 23, 2016

Jamberry Lace Noir Over Zoya Odetta

I went to the Franklin Institute's Science After Hours Speakeasy event and wanted to do my nails in a fancy and classy way, so naturally I reached for my Lace Noir wraps!  These have a gorgeous black lace pattern that is clear so you can put it over top of any nail polish color that you wish! I chose Zoya's Odetta because its a really nice mauvey purple shade.


I really liked how my nails looked over this color, however I think the next time I use this wrap I will put an even lighter color underneath to bring out the lace pattern even more.  The nails looks really cool up close however from farther away they just looked dark.
Regardless I definitely enjoyed this manicure and am already trying to decide which color to put under this wrap next!

Thursday, April 30, 2015

Fairy Wing Nails Using Zoya

This is another manicure that started out simple but the longer I spent studying the more I kept randomly adding to it.  It's just a coincidence that I used all Zoya polishes for this look, haha.
The gradient blue into the purple with the light sparkle at the base kind of makes me think of fairy wings :D


For the base I used Hudson which is an incredibly pretty metallic lilac.  I love this color so so so so very much for spring. I then gentle used Mosheen to create a blue sparkle gradient from the tip of my nails.  Finally I took Lux and created a light half circle at the base of my nails.  Now my nails are sparkly fairy wings.


I actually sketched out this fairy two days ago, perhaps when I color her in photoshop I'll base her wings off of this manicure!

Thursday, April 16, 2015

My First Jamberry Attempt with Silver Floral

My mom has been using these Jamberry nail wraps for a few months now.  She does all her fingers in about 10 minutes and they look perfect.  I've watched her do it a few times and it didn't look so hard.  I knew my first attempt would be less than wonderful so I thought I'd document it for you all to see.  Be warned this is my no means an indicator of how Jamberry will work for you.  Like I said my mom is a master, I believe it probably just takes some practice to get right.


I'll be using the clear nail wraps in Silver Floral. My mom gave me the 4 biggest sizes which you can cut down to fit any of your nails. 


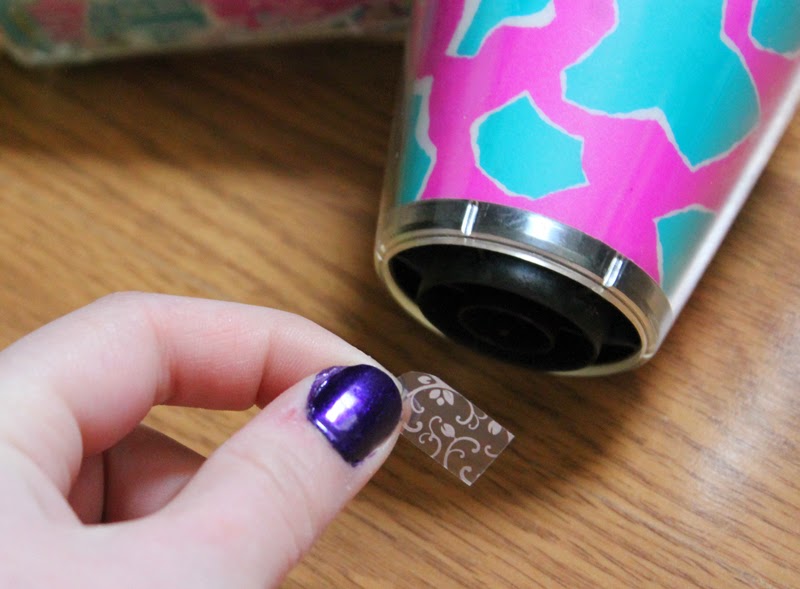
I took the biggest one, cut it in half, and then cut it in half again to get two small bits.  Make sure you line it up with your nails first to make sure it will still be big enough after cutting.  I then trimmed the bottoms to round them off so they would sit on my nail bed correctly.


So first you peel off the wraps and hold them in front of a heat source for a few seconds until they become pliable.  I used a mini hair dryer that I sat on the floor.


After getting it soft I stuck it on my nail and flatted it out as best as I could.  Obviously I had a heck of a lot of bubbles and bumps since there's no way to get a feel for how to apply these best on your first attempt. After flattening it down you are supposed to hold it in heat for another few seconds so the wrap binds to your nail.


This next part is where I ran into my first real issue.  You are supposed to file away the excess, which has worked fine for me with other stick on nail wraps but for whatever reason I could not break through these no matter how much I filed.  I'm not sure why because I've watched my mom file them off in seconds...maybe my file is just that crappy.  I had to instead take some nail clipper and clip my nails every so slightly to get it even with my nail.


Overall this looks pretty neat and even though mine are filled with air bubbles I'm hoping I can get better at it with some practice.  The nail polish is Zoya's Belinda.


This is an example from the Jamberry website of what you get for $15. f you are smart about how you use these one $15 pack can produce a lot of uses. If your nails are not long you can cut all of these in half and instantly double the amount like I did.
They are supposed to last 2 weeks on your finger nails and 3 weeks on your toenails.  That's pretty good considering my nail polish starts to chip after only 2 days.

Also I wanted to note that this specific type of nail wrap is metallic and the metallics are the hardest to use.  Of course I would start with the most difficult.....so if you want to purchase from Jamberry consider starting with a non metallic until you get the hang of application.

My mom is having an online Facebook party so I may be getting more of these to show you! In the meantime I'm going to keep practicing.

Price: $15


Wednesday, March 4, 2015

Matte Black Nail with White Dot Design

I received a Sephora nail art kit for Christmas and have been trying to experiment with all the different tools. Today I decided to use the white polish that comes with a pen fixture, perfect for drawing or dotting!


To get this look I applied Zoya's Noot (I use this so much I might actually run out!) and then put a matte top coat over it.  I use Sally Hansen's Big Matte top coat. I then took the little Sephora dotting pen and dotted away! It was so easy and the result is so cute! I love the minimalism. 
I can't believe those weird bulgy dot things on my nails! Even when I examine my nails close up I can barely make out the raised bumps....my camera plus the lighting must have seriously brought them out. So sorry for their unsightliness.  My nails look flawless in real life I promsie! Haha.

Sunday, February 22, 2015

Valentine's Day Nails

Ok yeah I know Valentine's Day was a while ago but with my camera dying I kind of have a backlog of posts. Oops! So even though its past here are my nails that I did for Valentine's Day!


For the base I used Formula X in Voodoo which is a absolutely gorgeous light metallic pink.  Then I took Demi by Zoya which is a dark berry shade and tipped each of my nails except for my ring finger where I instead drew a cute little heart.  I couldn't take this picture until a few days after Valentine's Day so I had to do a bit of touching up, that's why they look a little less than perfect.  Regardless I love my nails and I love these two polishes. Combined they make the perfect cute girly nail design.

Wednesday, February 18, 2015

Probelle Nail Polish in Into The Blue

So you may or may not have noticed that I did not do an Ipsy glam bag review for January.  Well the reason for that is that I was severely disappointed in everything I got except for this little blue nail polish.  I about flipped when they sent me yet another bronze eyeshadow.  I didn't even open it.  I looked at it in disgust and gave it to my mother.  I really really really hope I get off the wish list for Notoriously Morbid's monthly Vanishing Cabinet subscription.  As soon as I do I might cancel Ipsy.  the products are too neutral and boring to suit my tastes.

(I will not get my February bag until March because it always comes so late.  I'm hoping I'll like enough products from that bag to write a full review so look forward to that in March!)

Anyway I did like the nail polish that came in last month's bag so I will share it with you!


This nail polish is a brand I had never heard of before, Probelle.  I actually went to Ulta shortly after receiving this and saw it on the shelves so either I've been previously blind or this is a new product (however it does not seem that Ulta sells this online so now I'm questioning what I saw).  In my bag I got the shade Into The Blue.  Let me tell you, this blue is freaking gorgeous!  It is the perfect bright sky blue and I can see myself wearing this a lot in spring.  It is so fun and flashy!
The quality of this picture isn't the greatest as I took it with my phone while my camera was still dead but I think they came out fairly true to color.   The longevity of this polish isn't wonderful but it is still fairly decent.  I needed 3 light coats to get a fully opaque color.  One will definitely not be enough.  
Would I buy anymore polishes by this brand? Probably not unless they had something super unique.  I still prefer Zoya.
Speaking of Zoya the little bit of nail art was done using Zoya's Belinda.

Where to buy: Pro-belle.com
Price: $6.00


Thursday, January 8, 2015

Nail Design Using OPI My Voice is a Little Norse, Miami Beet, and Zoya's Noot


My current nail adventure came about by chance.  I had a vision and it just kind of took a completely different turn.  Initially I was just going to do the pink nails with the silver glitter but because My Voice is a Little Norse does not cover opaquely it looked a bit strange.  In order to save my manicure I took Noot, a dark grey, and turned the statement sparkle into an accent stripe.  Overall I think they looked pretty cute.  


However because I put the grey over the sparkle it acquired a bumpy texture upon drying.  I think this would have looked much better if I had done the sparkle strip over top of the pink and grey.  Live and learn!
Also Miami Beet looked much redder on my nails than it does in the bottle, which I was a little bummed about because it was supposed to match my dress.


These nails were done to match my dress for a New Years Eve dance.  Here is my boyfriend and I looking fancy :)
On my lips I'm wearing OCC Lip Tar in Black Dahlia.

Sunday, December 21, 2014

Zoya Nail Design Using Belinda and Lux

Now that its fall I can once again start wearing all the dark wintery Zoya nail polishes I got last year for Christmas! This week I used Zoya's Belinda and Lux to do a super cute dark purple with a silver sparkle accent.


This was one of my first times using tape to try and create a nail design.  The last time I tried the results were horrible and the polish got under the tape and it was worthless. I don't know if I have better tape now or if the chunky sparkles work better for this kind of thing but it worked perfectly this time!
I think for Christmas Lux will look perfect in this same design over a nice sparkly red. :)

Sunday, December 14, 2014

Formula X Nail Polish in Voodoo

While black Friday shopping I picked up one of the $10 black Friday deals at Sephora.  I got the Formula X nail polish duo in Voodoo and Juju.  I plan on giving Juju as a Christmas present so I only have Voodoo to show you today, sorry!
I've been wanting to try Formula X for a while after hearing such great things about its staying power and well...after giving it a try I currently have a love hate relationship with this polish.


Pros:  It is an absolutely gorgeous color.  The pink is so soft and dainty while also having an interesting sheen to it.  Its just so neat! It is also insanely opaque.  I could have only applied one coat to get a full layer of color but out of habit I applied two anyway.  Because of this I could see this being a great polish to do designs with over dark nail colors.  I'm already planning a black nail with pink polka dots look!
Cons:  This has no staying power.  My Zoya polishes usually chip after 3 or 4 days even after doing dishes.  This started to chip after 24 hours. WHAT. I thought oh maybe it's just a fluke and patched up the tips, well every day I've worn it more and more and more chips formed.  I am pretty bummed  that a nail polish at Sephora has the staying power of a drug store polish.


To stop the annoying chipping I patched up the damage as well as I could and added a coat of Zoya's Pixiedust polish in Lux to the tips, creating a super cute sparkly pink manicure.  My nails make me feel like a princess <3

So my final verdict....maybe other Formula X  shades are better but this one is best used for nail designs rather than a simple all over color because of its great coverage but lack luster staying power.
I don't think I'd buy another one of these at full price unless I was sure the staying power would be improved, but at $5 I'm not mad about this purchase

Where to buy: Sephora, formulax.com
Price:$12.50

Wednesday, November 19, 2014

Sally Hansen Nail Wraps in I Love Lacey


So I was moderately impressed with the NCLA Los Angeles nail wraps I reviewed a few weeks ago but after trying Sally Hansen's I am now extremely impressed.  My mom let me use two of her Sally Hansen nail wraps which matched a dress I wore to a dance.  I was expecting something similar to NCLA's....oh was I wrong.  I guess sometimes you really do get what you pay for.


I used these in the shade 480 I Love Lacey which is honestly a very beautiful pattern and did match my dress very well.  My issue was with the application and the longevity.  Because I put these on when I went home and therefore didn't have my good camera I couldn't take these pictures until 4 days after application and the wraps were already starting to chip at the end of my nail.  NCLA's lasted over a week without any chipping at all and that was even after washing dishes and cleaning my apartment.  As far as application these were much flimsier than NCLA's so I had a hard time controlling them in order to line them up over my nail. They were also much larger meaning they went over my nail and onto my skin on both sides making it very hard to clean up the edges, while NCLA's fit perfectly on my nail. I would never buy these over NCLA's because of quality and longevity, the frustration just isn't worth it. My mom will be going to a nail wrap party, I think Jamberry, so look forward to a review of those as well.

Where to buy: Ulta, Sally Hansen, and Target
Price: $4.99

Saturday, October 18, 2014

Monochromatic Sparkly Nail Design

Because I'm obsessed with OPI's My Voice is a Little Norse I did yet another overly sparkly nail look! And I know I will be using it again next weekend for a manicure I'm doing for a special dance. I love this color <3


To do this look I painted my nails with Zoya's Noot, a very dark grey. Then I carefully took Norse and made a half moon at the base of my nail and then a curved tip at the top of my nail to have a slightly curved strip of Noot showing through.  This mani was super cute and easy and I could definitely see doing it again with different base colors.

Thursday, July 17, 2014

Sally Hansen Big Matte Top Coat


After buying some Flormar matte nail polishes in Istanbul I knew I needed one of these matte top coats I've been hearing about. My friend said she had heard great things about Sally Hansen's so I picked it up at Target! 


Overall...I LOVE IT.  I think my nails are going to be matte for quite some time....


Sorry for the blurriness and unclean nails, but the focus here is the finish :P
I have on Zoya's Noot tipped with OPI's Respect the World.


I thought this was a cool way to show both hands at once. Left is with the matte top coat and right is just the nail polish.

Definitely worth the price!!

Where to buy: Target, Ulta, sallyhansen.com

Price: $5.99

<3__)~


Monday, June 23, 2014

Two Toned Speckled Nails

A friend of mine has had the Maybelline ColorShow Polka Dot nail polish for quite some time and I absolutely loved the results.  Reminds me of abstract art. I was at the drug store recently and when I saw it I had to pick up! Here is my favorite nail look I've done so far using it!


First I painted the top half of my nails with Zoya's Noot.  Then I put two coats of Maybelline's Pretty in Polka over top.  It is a sheer pink filled with hexagonal specs of black and light pink. Very cute, can't wait to experiment more with this cute top coat. Be aware that it will change the color of your polish, which for me was a plus it turned the grey into a beautiful dark purple!

<3__)~

Tuesday, May 13, 2014

Zoya Blue and Silver Flame Nail Design

This was definitely a nail experiment.  My friend said I should paint my nails blue and silver so I decided to try and get creative. This was the result! It isn't perfect but I kind of like the overall effect.


To do this I put down two coats of Timo.  I then put a generous drop of Seraphina at the base of my nail.  Using a very tiny paint brush I pushed the silver upwards to create a sort of flame effect.  I think next time I'm going to use a different brush, mine was a bit too stiff. I will definitely be trying this again with different colors!

<3__)~

Saturday, May 3, 2014

Zoya Nail Look using Hudson and Monet

Today's nail look was done using Zoya's Hudson with Zoya's Monet on top.  Hudson is a beautiful metallic light purple.  Perfect for spring! Monet is a top coat with a few multicolored reflective specs in it.  I'm actually not sure how I feel about Monet just because from certain angles it makes it look as if I have a chip in my nail. I'll have to try it over different colors and use it in varying intensities before I fully write it off.


So that little heart, I attempted the paint a design on a plastic bag, let it dry, peel it off, and stick it on your nail technique.  It worked...kind of.  It was a pain in the butt to get off the plastic bag.  I ended up messing up the heart a little bit.  Still an interesting concept, perhaps soon I'll try it with a more complicated design.

Where to buy: Zoya.com
Price: Hudson $9, Monet $10

Thursday, April 24, 2014

Zoya Purple and Pink Polka Dot Nails

I kept seeing all these adorable polka dot nails on Pinterest and I just had to try it myself.  Its nothing super special but people seem to compliment me like crazy whenever I do even a tiny simple design.  Not many people do their nails around here I suppose :P


Anyway I used two coats of Stevie for the base color.  Then I did dots of Demi, Odette, and Mason.  Mason and Demi look so different used separately so I was pretty sad to see them look almost identicle as dots.  Oh well, my nails are still adorable.

Where to buy: Zoya.com
Price $9-$10

<3__)~

Sunday, April 20, 2014

Zoya Nail Look using Noot and Anaka

So you've probably noticed that I do a lot of Zoya nail posts.  Well for Christmas my mom got me a huge box of Zoya nail polish....so I kind of have a ton of colors.  I like the formula and they make some pretty sweet shades.  Anyway here is a two toned look I did using Noot and Anaka.  I am a huge fan of this look.  The pink is sparkly while the grey is just shiny so it gives my nails an interesting contrast.  Plus the colors are just beautiful...especially that pink.

zoya nail polish noot and anaka

Where to buy: Zoya.com
Price: $9

Friday, March 28, 2014

Zoya Pixiedust Nail Polish in Lux

This nail polish makes my nails look like disco balls. Seriously.


This pixiedust stuff is so freaking pretty its ridiculous.  However, if Lux is anything like Stevie its gonna be a pain in the butt to remove.  Oh well, such is the price one must pay for fabulous sparkly nails.

In the name of Demacia, I will punish you!
Illuminate the enemy!
Lighting the way!

...Ok I'm done.

Where to buy: Zoya.com
Price: $10

Sunday, March 23, 2014

Zoya Nail Polish Design using Demi and Stevie

This is a really cute and simple nail look I did for Valentine's Day. I ended up not being able to see my boyfriend because of snow but at least my nails looked freaking sweet.  I got tons of compliments on this look!  All I did was paint my nails the base color and then do a thick stripe of the secondary color across the middle.  I do have to say that the Pixiedust Stevie polish, when paired with Demi, looks very pink.  When Stevie is worn alone it looks much more lavender.  I wore it by itself soon after this and was shocked because it basically looked like a different nail polish!


Where to Buy: Zoya.com
Price: Demi $9, Stevie $10


Saturday, March 15, 2014

Zoya Nail Polish Design Using Mosheen and Timo

I had a heck of a time trying to get a decent picture of this nail look. GAH it just refused to cooperate.  Basically I did Timo as a base and then put Mosheen only on the top half to get a gradient sparkly type look.  It is pretty and subtle and very easy to do.


Where to buy: Zoya.com
Price: $9